How to Integrate Discord Webhooks with Next.js 15 – Example Project
You’ve likely seen (or used) contact forms on websites that ask for customer feedback, potential work opportunities, customer contact info, and so on. But do you know what’s required to get all that feedback, contact info, and data sent to a private ...
You’ve likely seen (or used) contact forms on websites that ask for customer feedback, potential work opportunities, customer contact info, and so on. But do you know what’s required to get all that feedback, contact info, and data sent to a private Discord text channel the moment the user submits it?
In this case, there is no database to store the information. Rather, you just have a free Discord text channel that keeps the data as a sequence of messages in chat. And an admin/moderator/user with the required access rights can read through these messages and take the appropriate action.
In case you are new to Discord, it’s a great platform for chatting, playing video games, having calls, and even running a virtual team for your startup. It’s free, and you can download it from here.
Alright, coming back to the topic, I had a requirement like this to implement using Discord’s webhook and Next.js. I learned a lot from the activity. So I wrote this step-by-step tutorial about that process.
The primary objective here is to understand:
What is a Webhook and what are the use cases?
How to Integrate a webhook with a web application framework like Next.js
How to build a user interface with the latest APIs and components from Next.js
I hope you’ll like it. If you want to learn from a video, the article is also available as a video tutorial:
Table of Contents
How to Integrate the Webhook with the Next.js Form Component
How to Improve the Message feedback using React 19’s useActionState Hook
What is a Webhook?
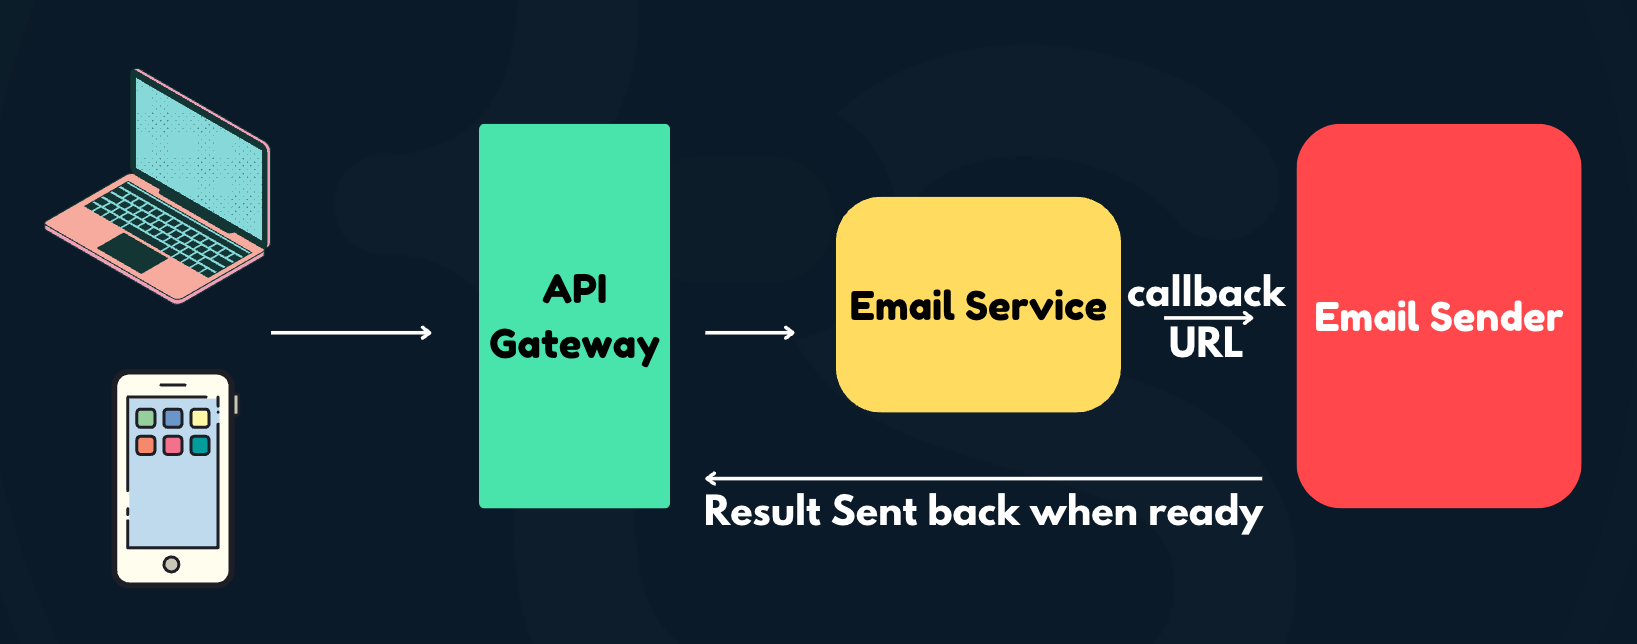
Assume we have an email service that connects to a third-party email sender to send emails to users. Traditionally, there will be an API gateway to talk to the email service from the client devices. When the request is received, the email service will contact the email-sending provider.
While the email-sending provider processes the emails, the email service needs to know their status. One generic way to handle this is for the email service to poll for the status at a short frequency and update the client as and when the status changes. But this method has many drawbacks, such as resource mis-utilization, unnecessary connections, and poor performance.
On the contrary, how about the email service registers a callback URL that the email sender can call with relevant information when the email-sending action has been completed? This way, there is no unnecessary polling. Rather, the email sender can proactively inform the email service of a success or a failure after attempting to send the email. Then, the email service can respond to the clients regarding their status accordingly.
This registered callback is called a Webhook. Webhooks are widely used today in various industries like payments and checkout, system health monitoring, and third-party app integrations.
How to Configure a Webhook on Discord
You should now have an idea of how webhooks work, so let’s configure one with Discord.
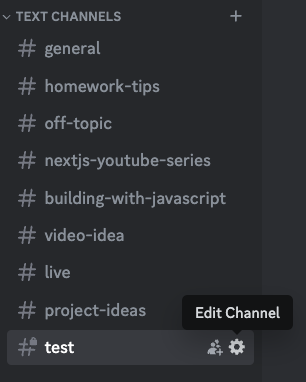
Create or select a text channel on your Discord server. Click on the Edit Channel button.
Then, from the left-side navigation menu, select the Integration option. You should see the Webhooks option listed there.
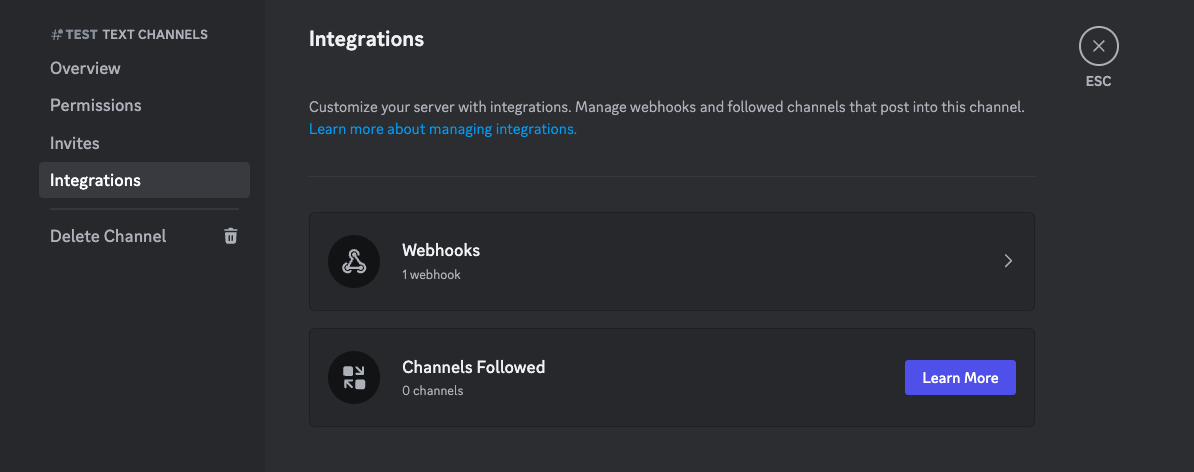
Click on the Webhooks option and then click on the New Webhook button.
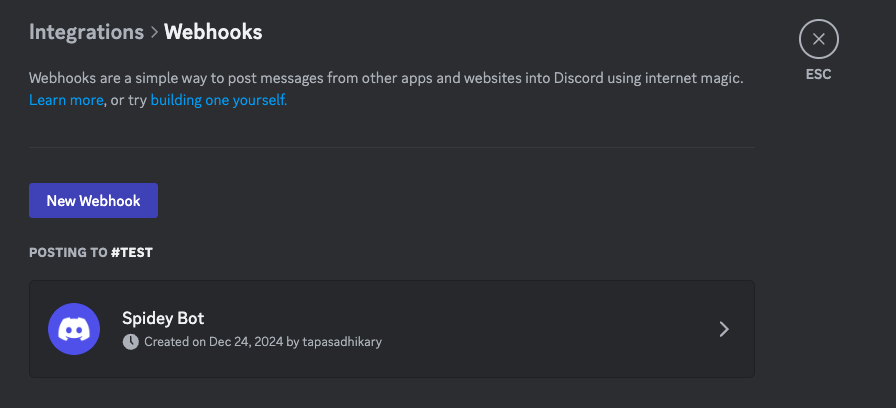
Give your webhook a name, and you can optionally upload a photo. This can be helpful when you have multiple webhooks and you want to quickly identify them by their photo and name.
Now, click on the Copy Webhook URL button to copy the webhook URL. Keep it safe somewhere, as we will be using it shortly in our application.
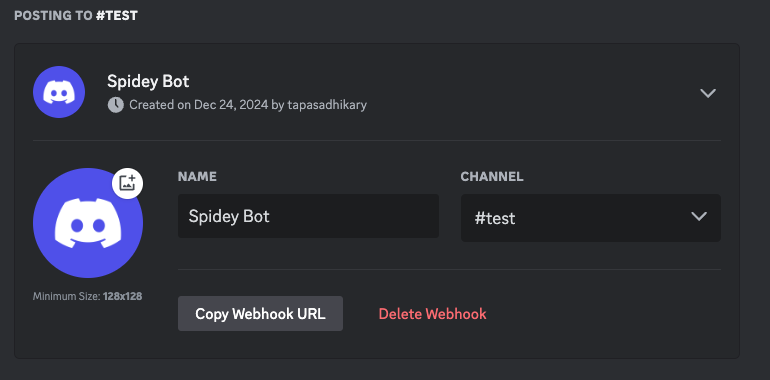
That’s it. Now let’s create a Next.js 15 application so we can integrate the webhook with it.
How to Create a Next.js Project
Open the terminal and use the following command to create a Next.js application:
npx create-next-app@latest
You’ll have to provide a few inputs for the initial project to create it. I will be using JavaScript (as opposed to TypeScript), Tailwind CSS, App Router, and Turbopack for this project. So I’ve opted for those choices by providing Yes as the response.
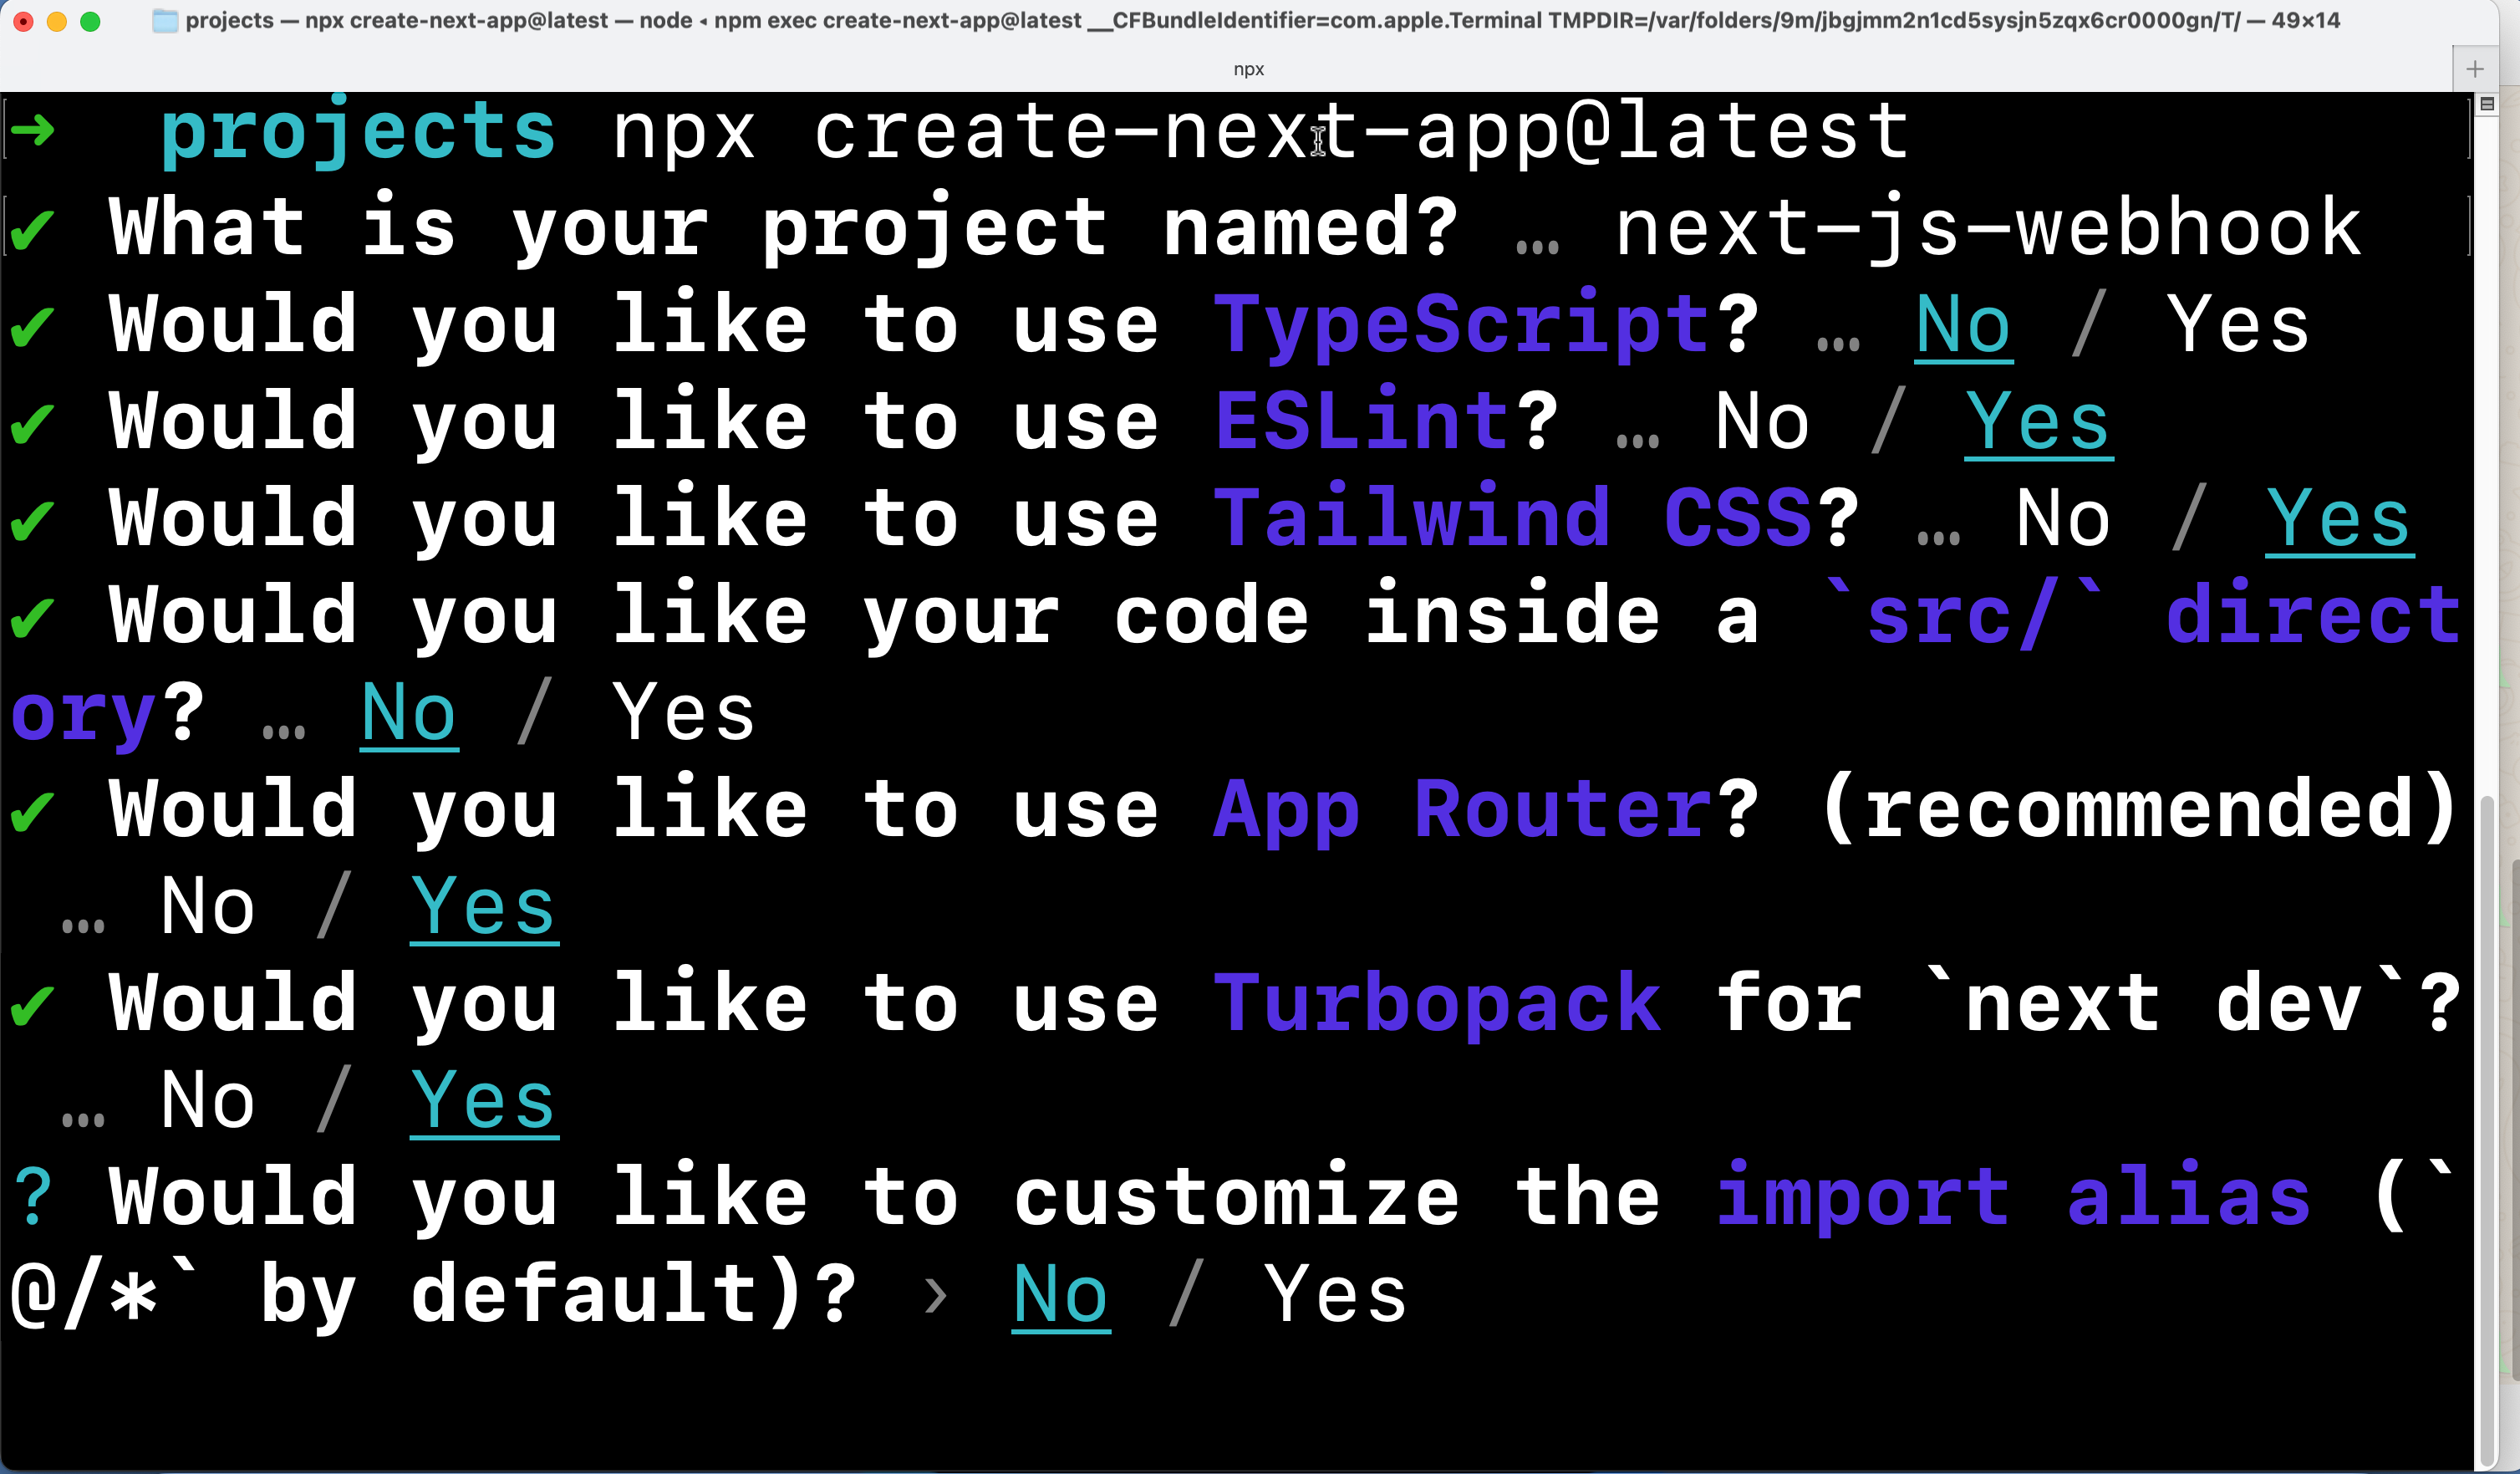
With that, you’ve created a Next.js project you can use for the rest of the tutorial.
How to Set Environment Variables
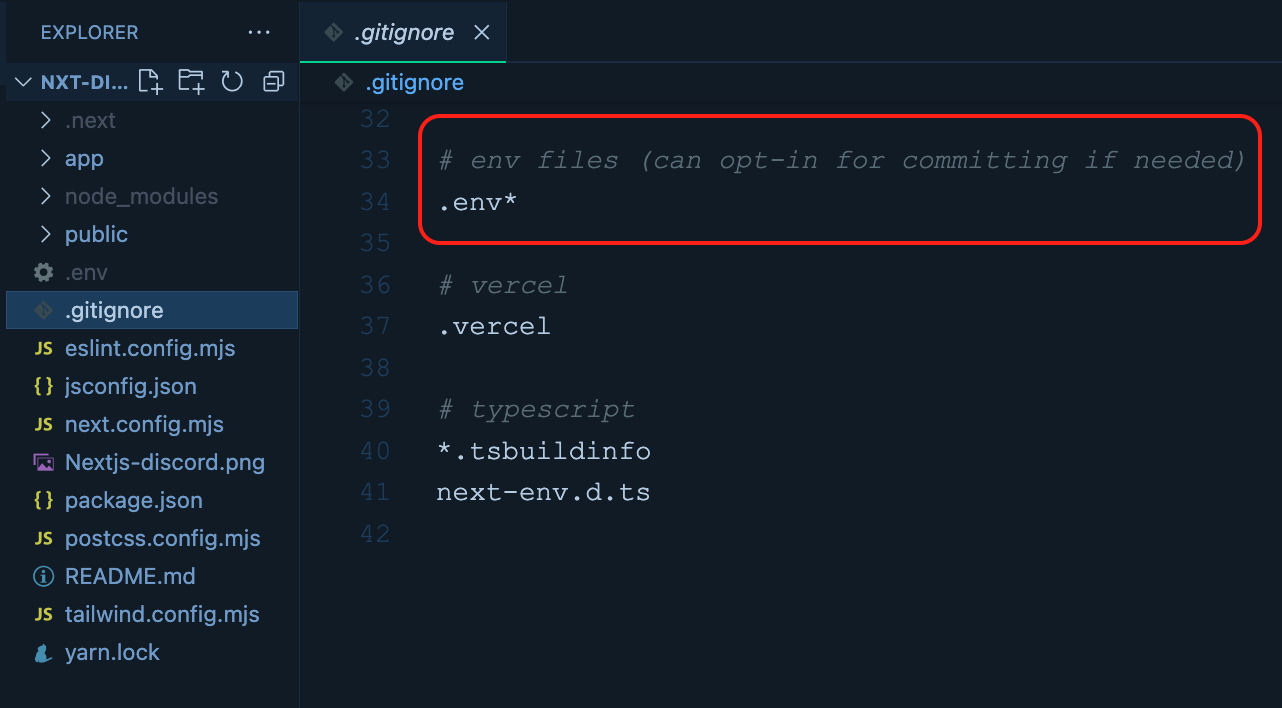
Create a .env file at the root of your project. We will now create an environment variable secret with the webhook URL you had copied before. Create an entry in the .env file like this:
DISCORD_WEBHOOK_URL=
Make sure you replace the .env file. Remember, you must not commit and push this file to your version control. So, make sure that the .env file has been added to the .gitignore file of the project.
How to Integrate the Webhook with the Next.js Form component
Now, we will create the user interface to capture inputs from the user and send those to the Discord text channel using the webhook.
Let’s create a simple message form using the component from Next.js. The component is an extension of HTML’s native form with more flexibilities and features introduced by the release of Next.js 15. I would suggest that you go over this project-based video tutorial if you are interested in learning more about this new addition to Next.js.
Our strategy here is very straightforward:
We will create a form and add an action to it using the form’s
actionprop.We will then create a Server Action using the webhook URL to communicate with Discord.
The action will be invoked when the user fills up the form and submits it. Thus the webhook communication will be done.
Let’s write the code for these functionalities now.
Create the Form
Create a folder called _components under the app/ directory. Now, create a file message-form.jsx under the app/_components/ folder with the following code:
import Form from "next/form";
import { sendDiscordMessage } from "../actions";

const MessageForm = () => {
  return (
    <Form className="flex flex-col items-center" action={sendDiscordMessage}>
      <input
        type="text"
        placeholder="Your name"
        name="username"
        className="border p-1 rounded w-[300px] my-2"
        required
      />

      <input
        type="email"
        placeholder="Your e-mail"
        name="email"
        className="border p-1 rounded w-[300px] my-2"
        required
      />

      <input
        type="text"
        placeholder="Your Image Url"
        name="dp"
        className="border p-1 rounded w-[300px] my-2"
      />

      <select
        name="type"
        className="p-1 rounded border my-2 w-[300px]"
        required
      >
        <option value="">Message Typeoption>
        <option value="thanks">Say, Thanks!option>
        <option value="qa">QAoption>
        <option value="general">Generaloption>
      select>

      <textarea
        placeholder="What do you want to say?"
        name="message"
        className="border p-1 rounded w-[300px] my-2"
        required
      />

      <button
        type="submit"
        className="bg-blue-500 w-[70px] text-white rounded-md"
      >
        Send
      button>
    Form>
  );
};

export default MessageForm;
Here, we have created a basic form with five fields for users to enter their name, email, profile image URL, message type (general, thanks, qa), and the message. There is a send button as well to submit the form.
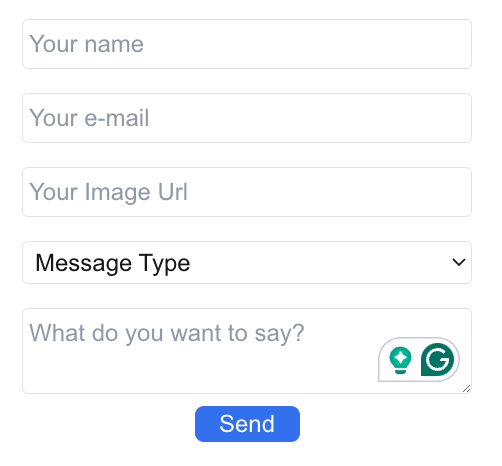
We have used the Form component from the next/form package. The Form component allows us to execute a function on the server (server action) with the help of its action attribute. As you can see in the code above, we have imported a server action sendDiscordMessage and used that as the value for the action attribute of the form.
<Form className="flex flex-col items-center" action={sendDiscordMessage}>
Now, let’s create the server action so that we can submit the form with it.
Create the Server Action
We’ll use a server action to send messages to Discord using webhooks. Create a folder called actions under the app/ directory. It’s a convention to keep all the actions colocated under the actions/ directory. Now, create a file called index.js under the app/actions/ directory with the following code:
"use server";

export const sendDiscordMessage = async (formData) => {
  try {
    const rawFormEntries = Object.fromEntries(formData);

    console.log(rawFormEntries);

    await fetch(process.env.DISCORD_WEBHOOK_URL, {
      method: "POST",
      headers: {
        "Content-Type": "application/json",
      },
      body: JSON.stringify({
        username: rawFormEntries?.username,
        avatar_url: rawFormEntries?.dp || "https://i.imgur.com/mDKlggm.png",
        content: rawFormEntries?.message,
        embeds: [
          {
            fields: [
              {
                name: "Email",
                value: rawFormEntries?.email,
                inline: true,
              },
              {
                name: "Message Type",
                value: rawFormEntries?.type,
                inline: true,
              },
            ],
          },
        ],
      }),
    })
  } catch (err) {
    console.log(err.message);
  }
};
Let’s understand what’s going on in the above code:
In Next.js (or with React 19), a server function (aka server action) needs a special directive called
”use server”at the top of the file. So we have declared that.A server action is an async function that gets the
formDataas a parameter. TheformDatawill contain the values of all the form fields submitted by the user. We can use theObject.formEntries()API to get a key-value pair from theformData. Check this out to learn the best way to handle formData in JavaScript.Next, we used the Discord webhook URL to make a
POSTcall with the required payload to create the message.Let’s understand the payload format well. We need to follow a specific payload structure for the discord webhook to create the message. It follows a schema to have the following:
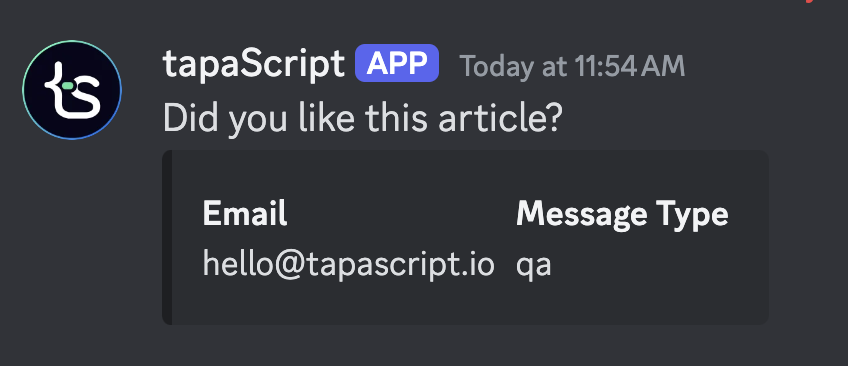
username: the name of the message sender. It appears at the top of the message. We’re reading the name field from the submitted data and populating theusernamefield.avatar_url: the profile photo of the message sender. We have adpfield in the form to capture the profile photo URL. We’re using that, and in case the user does not provide it, we’re using a default image as the profile photo.content: Thecontentfield is the actual message content. We are reading the value of themessagefield and populating the value.embeds: In the Discord message, you can use embeds. These embeds could be text messages, images, or videos. We will utilize the embeds to show the email and message type information. Theembedsis an array of fields. In each of the fields, we have passed theemailand messagetypevalues as theinlinevalues. Inline values will appear in line, side by side.
How to Update the App Page
Finally, let’s update the application’s page with our form component so that everything gets stitched together. Open the page.js file under the app/ directory and paste in the following code:
import MessageForm from "./_components/message-form";

export default function Home() {
    return (
        <div className="flex flex-col justify-center items-center">
          <h1 className="text-3xl my-3">Send a message to tapaScripth1>
          <MessageForm />
        div>
      )
}
Here we have integrated the form with the app page so that we can access it on the browser.
Let’s Test it Out
Now you can run the app with the command yarn dev from your terminal. The app will be available on localhost:3000 by default. Open a browser tab and hit the URL http://localhost:3000. You should see a form like the one below. Fill it out with values and hit the Send button.
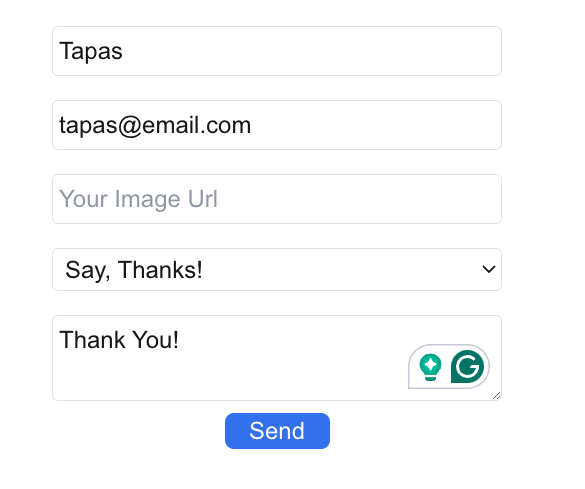
Go to the text channel of your Discord server and check for a message that should appear there momentarily. Check that the fields of the message match the input values you provided in the form.
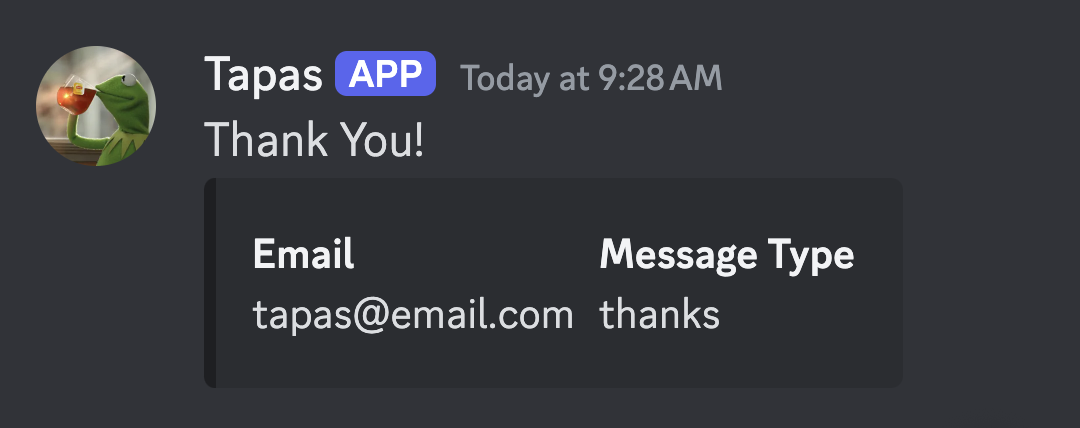
TADA! We have done it. But hold on – we can make it even better. Did you notice that we aren’t showing any kind of feedback saying the “Message has been sent successfully”, or “There are issues in sending the message”? We’re not taking care of providing the result of the server action to the form component. Let’s fix that.
How to Improve the Message Feedback using React 19’s useActionState Hook
React 19 introduced a hook called useActionState that helps you update the state based on the result of a server action. Let’s use this hook to enhance the message form and the server action so that when the action gets executed successfully (or fails), we can notify the form component to change its state and show the success/error messages accordingly.
Set up a toaster
We will use a toast message to show the success/error messages. Let’s use the toast library called sonner. First, install it with this command:
yarn add sonner
Now, we have to add the Toaster from sonner to our app. The best place to add it is at the root level Layout of the application. Open the layout.js file and import the Toaster:
import { Toaster } from 'sonner';
Then, use the Toaster in the JSX of the layout:
 <html lang="en">
      <body
        className={`${geistSans.variable} ${geistMono.variable} antialiased`}
      >
        {children}
        <Toaster richColors />
      body>
 html>
That’s it. The toaster set-up is done. Now we will be able to use it in our components to show the toast messages.
Enhance the Form with the useActionState Hook
First, import the useActionState and useEffect hooks into the message-form.jsx file. Also, import the toast from sonner. As we will be using the hooks now, we have to make the message-form component a client component. So, add the ”use client” directive at the top of the file.
"use client";

import Form from "next/form";
import { useActionState } from "react";
import { sendDiscordMessage } from "../actions";
import { useEffect } from "react"
import { toast } from "sonner";
Next, use the useActionState hook to get the formState updated from the server action result. An isPending state tells us if the form submission has been completed. The useActionState returns a new formAction from the existing server action instance.
The syntax goes like this:
const [formState, formAction, isPending] = useActionState(sendDiscordMessage,null);
Now, we need to use this formAction as the value of the action attribute of the component:
<Form className="flex flex-col items-center" action={formAction}>
Next, use the useEffect hook to track the formState changes and show the toast message accordingly. The shape of the formState can be customized based on our needs. We will see shortly how the server action can return this state value.
  useEffect (() => {
    if (formState?.success) {
      toast.success(formState?.message);
    } else if (formState?.success === false) {
      toast.error(formState?.message);
    }
  },[formState?.success])
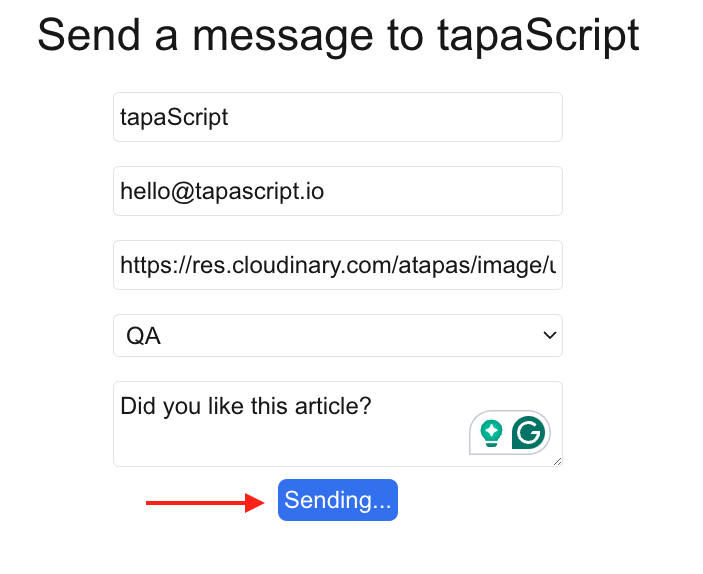
The last thing here is to improve the UX of the form using the isPending state we got from the useActionState hook. The value of the isPending state will be true if the form is still in transition and being submitted. It will be changed to false when the form is submitted. So we can use the state value to customize the submit button text.
<button
  type="submit"
  className="bg-blue-500 w-[70px] text-white rounded-md">
    {isPending ? "Sending..." : "Send"}
button>
Those are all the changes we need to make in the form component. Here’s the complete code of the modified form component for you to check out and use:
"use client";

import Form from "next/form";
import { useActionState } from "react";
import { sendDiscordMessage } from "../actions";
import { useEffect } from "react"
import { toast } from "sonner";

const MessageForm = () => {
  const [formState, formAction, isPending] = useActionState(
    sendDiscordMessage,
    null
  );

  useEffect (() => {
    if (formState?.success) {
      toast.success(formState?.message);
    } else if (formState?.success === false) {
      toast.error(formState?.message);
    }
  },[formState?.success])


  return (
    <Form className="flex flex-col items-center" action={formAction}>
      <input
        type="text"
        placeholder="Your name"
        name="username"
        className="border p-1 rounded w-[300px] my-2"
        required
      />

      <input
        type="email"
        placeholder="Your e-mail"
        name="email"
        className="border p-1 rounded w-[300px] my-2"
        required
      />

      <input
        type="text"
        placeholder="Your Image Url"
        name="dp"
        className="border p-1 rounded w-[300px] my-2"
      />

      <select
        name="type"
        className="p-1 rounded border my-2 w-[300px]"
        required
      >
        <option value="">Message Typeoption>
        <option value="thanks">Say, Thanks!option>
        <option value="qa">QAoption>
        <option value="general">Generaloption>
      select>

      <textarea
        placeholder="What do you want to say?"
        name="message"
        className="border p-1 rounded w-[300px] my-2"
        required
      />

      <button
        type="submit"
        className="bg-blue-500 w-[70px] text-white rounded-md"
      >
        {isPending ? "Sending..." : "Send"}
      button>
    Form>
  );
};

export default MessageForm;
How to Update the Server Action to Return Results
The changes in the server action should be as follows:
When you use the
useActionStatehook, pass a returnedformActionto the form. We have seen this before. It helps in multiple ways, and one of them is getting the previous state value of theformStateinside the server action. You must be mindful to pass it as the first argument to the server function, and then theformData.We can now return the result of the server action so that the
formStategets updated with the result. We will create a result structure with a booleansuccessfield indicating if it is a success or error scenario and amessagefield with the actual message.
Here’s the changed code with the above two updates:
"use server";

export const sendDiscordMessage = async (prevState, formData) => {
  try {
    const rawFormEntries = Object.fromEntries(formData);

    console.log(rawFormEntries);

    await fetch(process.env.DISCORD_WEBHOOK_URL, {
      method: "POST",
      headers: {
        "Content-Type": "application/json",
      },
      body: JSON.stringify({
        username: rawFormEntries?.username,
        avatar_url: rawFormEntries?.dp || "https://i.imgur.com/mDKlggm.png",
        content: rawFormEntries?.message,
        embeds: [
          {
            fields: [
              {
                name: "Email",
                value: rawFormEntries?.email,
                inline: true,
              },
              {
                name: "Message Type",
                value: rawFormEntries?.type,
                inline: true,
              },
            ],
          },
        ],
      }),
    });

    return {
      success: true,
      message: `Your message has been sent successfully.`,
    };
  } catch (err) {
    console.log(err.message);
    return {
      success: false,
      message: `Problem is sending message ${err.message}`,
    };
  }
};
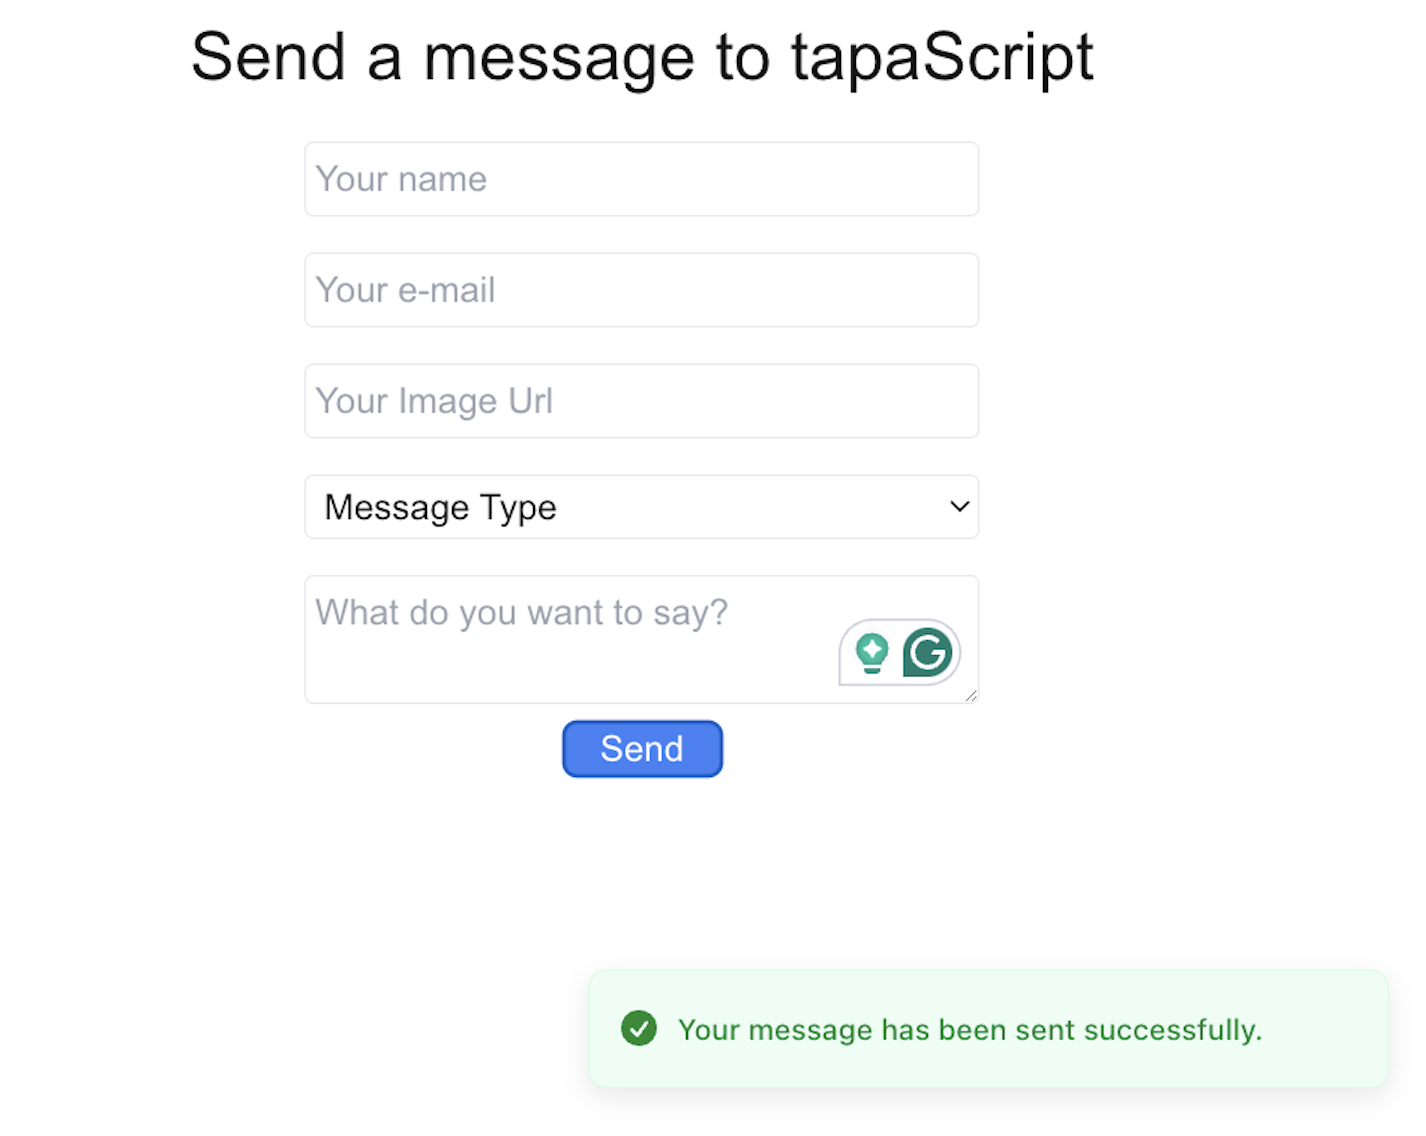
As you must have noticed, the returned result is the formState we have used inside the form component to show the toast messages.
Let’s Test it One More Time
Let’s test things out with all the changes.
- First, fill out the form with the details. Now we’re using a profile picture URL rather than keeping it empty. Click on the
Sendbutton.
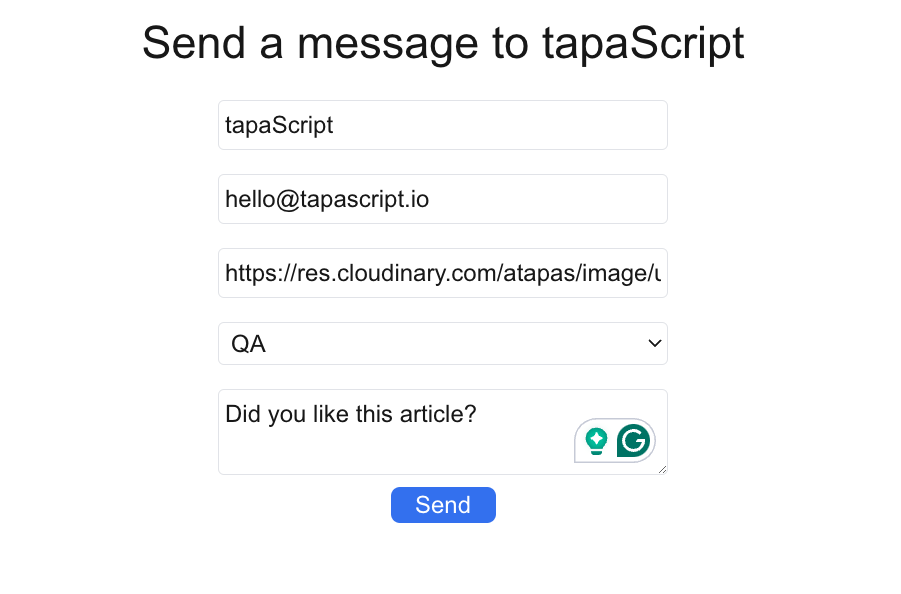
- You should see the that button text gets changed to
Sending…while the form is being submitted.
- After the submission, you should get the success message in the toast. Also, the form state should be restored to its original state.
- On the Discord text channel, you should see the message posted successfully.
That’s amazing! We have now made the app much better with the message and error handling.
Source Code and Resources
All the source code used in this article is in the GitHub repository. You can take a look, follow the README to set it up, and run it locally.
Here are the resources I mentioned in the article that you may find helpful:
Also, you can connect with me by:
Subscribing to my YouTube Channel. If you are willing to learn
Reactand its ecosystem, likeNext.js, with both fundamental concepts and projects, I have great news for you: you can check out this playlist on my YouTube channel with 30+ video tutorials and 20+ hours of engaging content so far, for free. I hope you like them as well.Following me on X (Twitter) or LinkedIn if you don't want to miss the daily dose of up-skilling tips.
Checking out and following my Open Source work on GitHub.
I regularly publish meaningful posts on my GreenRoots Blog, you may find them helpful, too.
See you soon with my next article. Until then, please take care of yourself, and keep learning.
What's Your Reaction?


